Adds the PVC Bootstrap system, which allows the automated deployment of
one or more PVC clusters.
4.6 KiB
PVC Bootstrap System
The PVC bootstrap system provides a convenient way to deploy PVC clusters. Rather than manual node installation, this system provides a fully-automated deployment from node powering to cluster readiness, based on pre-configured values. It is useful if an administrator will deploy several PVC clusters or for repeated re-deployment for testing purposes.
Setup
Setting up the PVC bootstrap system manually is very complicated, and has thus been automated with an installer script instead of providing a Debian or PIP package.
Preparing to use the PVC Bootstrap system
-
Prepare a Git repository to store cluster configurations. This can be done automatically with the
create-local-repo.shscript in the PVC Ansible repository. -
Create
group_varsfor each cluster you plan to bootstrap. Additionally, ensure you configure thebootstrap.ymlfile for each cluster with the relevant details of the hardware you will be using. This step can be repeated for each cluster in the future as new clusters are required, and the system will automatically pull changes to the local PVC repository once configured.
Preparing a PVC Bootstrap host
-
The recommended OS for a PVC Bootstrap host is Debian GNU/Linux 10+. In terms of hardware, there are several supported options:
i) A small single-board computer with wired Ethernet like a Raspberry Pi on
aarch64(32-bit ARM not supported); at least a Pi model 4 or similar modern system is required; Pi models 1-3 do not supportaarch64or are extremely slow in comparison, especially when building the initial TFTP installer root.ii) A small desktop computer on
amd64with at least one wired Ethernet port.iii) A VM on
amd64oraarch64connected to the required networks. -
Set up a basic outbound network with Internet access; as detailed below, the installer will take care of the internal bootstrap network, either on a dedicated NIC or vLAN, with this host providing NAT'd access out.
-
Clone this repository somewhere on the host, for instance to
/srvor/home. -
Run the
./install-pvcbootstrapd.shscript from the root of the repository to install the PVC Bootstrap system on the host. It will prompt for several configuration parameters. The final steps will take some time so be patient.
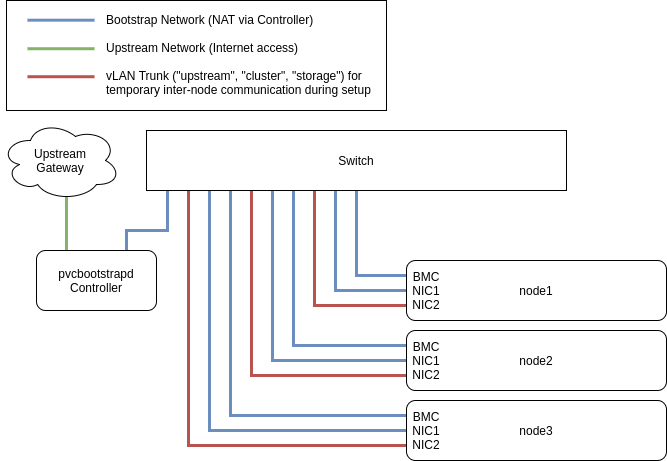
Networking for Bootstrap
When using the pvcbootstrapd system, a dedicated network is required to provide bootstrap DHCP and TFTP to the cluster. This network can either have a dedicated, upstream router that does not provide DHCP, or the network can be routed with network address translation (NAT) through the bootstrap host. By default, the installer will configure the latter automatically using a second NIC separate from the upstream NIC of the bootstrap host, or via a vLAN on top of the single NIC.
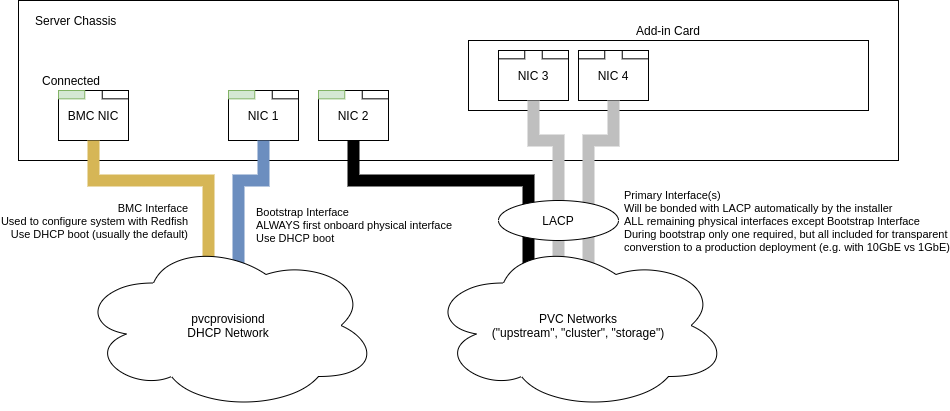
In bootstrap mode (as opposed to manual install mode), new nodes are configured with their interfaces as follows:
- BMC: bootstrap
- Interface 1 (first among all LOM ports): bootstrap
- Interface 2+ (all other ports): LACP (802.3ad) bond0
The Bootstrap interfaces do DHCP from the bootstrap host, and are thus responsible for autoconfiguration. The remaining interfaces, in an LACP bond, are used to underlay the various standard PVC networks.
Care must therefore be taken to ensure that the BMC and first lan-on-motherboard interface are connected as vLAN access ports in the bootstrap network, and that the remaining ports have some connectivity along the various configured PVC networks, before proceeding.
Consider the following diagram for reference:
Deploying a Cluster with PVC Bootstrap
-
Ensure the cluster configuration
hostsentries andgroup_varsare committed to the local PVC repository, including the BMC MAC addresses, default IPMI credentials, and desired hooks (bootstrap.yml), and all other cluster configurations (base.ymlandpvc.yml). Generated configurations (e.g.files) will be automatically committed to the repository. -
Connect the network ports as outlined above.
-
Connect power to the servers, but do not power on.
-
Wait for the cluster bootstrapping to complete; you can watch the output of the
pvcbootstrapdandpvcbootstrapd-workerservices on the Bootstrap host to see progress. If supported, the indicator LEDs of the nodes will be lit during setup and will be disabled upon completion to provide a physical indication of the process. -
Power off the servers and put them into production.