What is PVC?
PVC is a Linux KVM-based hyperconverged infrastructure (HCI) virtualization cluster solution that is fully Free Software, scalable, redundant, self-healing, self-managing, and designed for administrator simplicity. It is an alternative to other HCI solutions such as Ganeti, Harvester, Nutanix, and VMWare, as well as to other common virtualization stacks such as ProxMox and OpenStack.
PVC is a complete HCI solution, built from well-known and well-trusted Free Software tools, to assist an administrator in creating and managing a cluster of servers to run virtual machines, as well as self-managing several important aspects including storage failover, node failure and recovery, virtual machine failure and recovery, and network plumbing. It is designed to act consistently, reliably, and unobtrusively, letting the administrator concentrate on more important things.
PVC is highly scalable. From a minimum (production) node count of 3, up to 12 or more, and supporting many dozens of VMs, PVC scales along with your workload and requirements. Deploy a cluster once and grow it as your needs expand.
As a consequence of its features, PVC makes administrating very high-uptime VMs extremely easy, featuring VM live migration, built-in always-enabled shared storage with transparent multi-node replication, and consistent network plumbing throughout the cluster. Nodes can also be seamlessly removed from or added to service, with zero VM downtime, to facilitate maintenance, upgrades, or other work.
PVC also features an optional, fully customizable VM provisioning framework, designed to automate and simplify VM deployments using custom provisioning profiles, scripts, and CloudInit userdata API support.
Installation of PVC is accomplished by two main components: a Node installer ISO which creates on-demand installer ISOs, and an Ansible role framework to configure, bootstrap, and administrate the nodes. Installation can also be fully automated with a companion cluster bootstrapping system. Once up, the cluster is managed via an HTTP REST API, accessible via a Python Click CLI client or WebUI (eventually).
Just give it physical servers, and it will run your VMs without you having to think about it, all in just an hour or two of setup time.
More information about PVC, its motivations, the hardware requirements, and setting up and managing a cluster can be found over at our docs page.
PVC Bootstrap System
The PVC bootstrap system provides a convenient way to deploy PVC clusters. Rather than manual node installation, this system provides a fully-automated deployment from node powering to cluster readiness, based on pre-configured values. It is useful if an administrator will deploy several PVC clusters or for repeated re-deployment for testing purposes.
Setup
Setting up the PVC bootstrap system manually is very complicated, and has thus been automated with an installer script instead of providing a Debian or PIP package.
Preparing to use the PVC Bootstrap system
-
Prepare a Git repository to store cluster configurations. This can be done automatically with the
create-local-repo.shscript in the PVC Ansible repository. -
Create
group_varsfor each cluster you plan to bootstrap. Additionally, ensure you configure thebootstrap.ymlfile for each cluster with the relevant details of the hardware you will be using. This step can be repeated for each cluster in the future as new clusters are required, and the system will automatically pull changes to the local PVC repository once configured.
Preparing a PVC Bootstrap host
-
The recommended OS for a PVC Bootstrap host is Debian GNU/Linux 10+. In terms of hardware, there are several supported options:
i) A small single-board computer with wired Ethernet like a Raspberry Pi on
aarch64(32-bit ARM not supported); at least a Pi model 4 or similar modern system is required; Pi models 1-3 do not supportaarch64or are extremely slow in comparison, especially when building the initial TFTP installer root.ii) A small desktop computer on
amd64with at least one wired Ethernet port.iii) A VM on
amd64oraarch64connected to the required networks. -
Set up a basic outbound network with Internet access; as detailed below, the installer will take care of the internal bootstrap network, either on a dedicated NIC or vLAN, with this host providing NAT'd access out.
-
Clone this repository somewhere on the host, for instance to
/srvor/home. -
Run the
./install-pvcbootstrapd.shscript from the root of the repository to install the PVC Bootstrap system on the host. It will prompt for several configuration parameters. The final steps will take some time (up to 2 hours on a Raspberry Pi 4B) so be patient.
Networking for Bootstrap
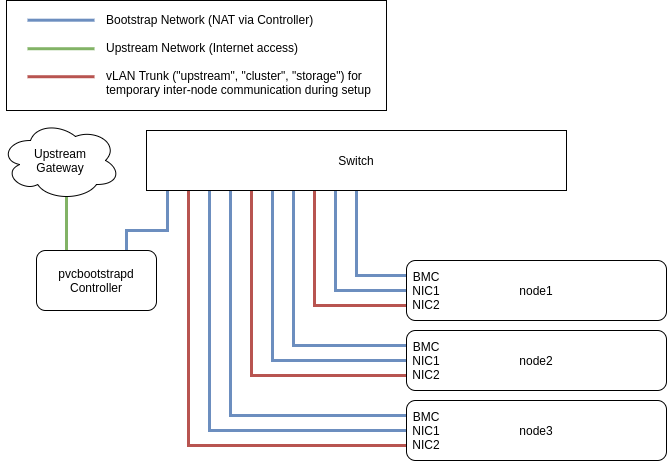
When using the pvcbootstrapd system, a dedicated network is required to provide bootstrap DHCP and TFTP to the cluster. This network can either have a dedicated, upstream router that does not provide DHCP, or the network can be routed with network address translation (NAT) through the bootstrap host. By default, the installer will configure the latter automatically using a second NIC separate from the upstream NIC of the bootstrap host, or via a vLAN on top of the single NIC.
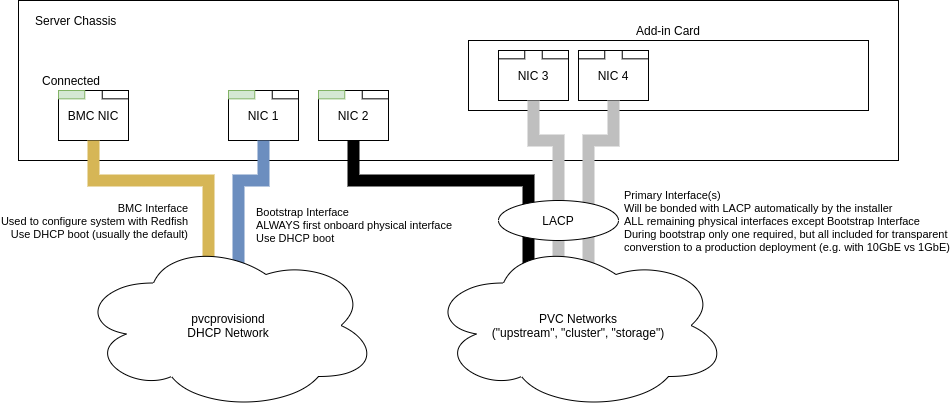
In bootstrap mode (as opposed to manual install mode), new nodes are configured with their interfaces as follows:
- BMC: bootstrap
- Interface 1 (first among all LOM ports): bootstrap
- Interface 2+ (all other ports): LACP (802.3ad) bond0
The Bootstrap interfaces do DHCP from the bootstrap host, and are thus responsible for autoconfiguration. The remaining interfaces, in an LACP bond, are used to underlay the various standard PVC networks.
Care must therefore be taken to ensure that the BMC and first lan-on-motherboard interface are connected as vLAN access ports in the bootstrap network, and that the remaining ports have some connectivity along the various configured PVC networks, before proceeding.
Consider the following diagram for reference:
Deploying a Cluster with PVC Bootstrap - Redfish
Redfish is an industry-standard RESTful API for interfacing with the BMC (baseband management controller, or out-of-band network management system) on modern (post ~2015) servers from most vendors, including Dell iDRAC, HP iLO, Cisco CIMC, Lenovo XCC, and Supermicro X10 and newer BMCs. Redfish allows remote management, data collection, and configuration from the BMC in a standardized way across server vendors.
The PVC Bootstrap system is designed to heavily leverage Redfish in its automation. With Redfish, cluster deployment is plug-and-play, with no human input after committing the required configuration and connecting the servers. The steps are thus:
-
Ensure the cluster configuration
hostsentries andgroup_varsare committed to the local PVC repository, including the BMC MAC addresses, default IPMI credentials, and desired hooks (bootstrap.yml), and all other cluster configurations (base.ymlandpvc.yml). Generated configurations (e.g.files) will be automatically committed to the repository. -
Connect the network ports as outlined in the above diagrams.
-
Connect power to the servers, but do not manually power on the servers - Redfish will handle this aspect after characterizing each host, as well as manage boot, RAID array creation (as documented in
bootstrap.yml), BIOS configuration, etc. -
Wait for the cluster bootstrapping to complete; you can watch the output of the
pvcbootstrapdandpvcbootstrapd-workerservices on the Bootstrap host to see progress, or configure the system to send webhooks to a remote target (e.g. Slack/Mattermost messages). If supported, the indicator LEDs of the nodes will be lit during setup and will be disabled upon completion to provide a physical indication of the process. -
Verify and power off the servers and put them into production; you may need to complete several post-install tasks (for instance setting the production BMC networking via
sudo ifup ipmion each node) before the cluster is completely finished.
Deploying a Cluster with PVC Bootstrap - Non-Redfish
The PVC Bootstrap system can still handle nodes without Redfish support, for instance older servers or those from non-compliant vendors. There is however more manual setup in the process. The steps are thus:
-
Ensure the cluster configuration
hostsentries andgroup_varsare committed to the local PVC repository, including the BMC MAC addresses, default IPMI credentials, and desired hooks (bootstrap.yml), and all other cluster configurations (base.ymlandpvc.yml). Generated configurations (e.g.files) will be automatically committed to the repository. Ensure you setredfish: noin the appropriate section of thebootstrap.ymlfile; the BMC credentials can be empty but the variables must exist. -
Do not (yet) connect network ports.
-
Connect power to the servers and power them on.
-
Perform any required configuration of BIOS settings, hardware RAID arrays for the system disk, etc.
-
Power off the servers.
-
Create a set of host configuration files in the TFTP
hostdirectory on the PVC controller, by default at/srv/pvc/tftp/host, one per node. You will need to know the MAC address of the first ethernet (bootstrap network) port of each node to correctly set the filename. Some example contents for the two files are shown below. -
Connect the network ports as outlined in the above diagrams.
-
Power on the servers and set them to boot temporarily (one time) from PXE.
-
Wait for the cluster bootstrapping to complete; you can watch the output of the
pvcbootstrapdandpvcbootstrapd-workerservices on the Bootstrap host to see progress, or configure the system to send webhooks to a remote target (e.g. Slack/Mattermost messages). If supported, the indicator LEDs of the nodes will be lit during setup and will be disabled upon completion to provide a physical indication of the process. -
Verify and power off the servers and put them into production; you may need to complete several post-install tasks (for instance setting the production BMC networking via
sudo ifup ipmion each node) before the cluster is completely finished.
host-MAC.ipxe
#1ipxe

# The name of this file is "host-123456abcdef.ipxe", where "123456abcdef" is the MAC address of the
# server's Bootstrap Ethernet port (on-motherboard port 1), without spaces or punctuation.

# ARGUMENTS are any additional kernel command line arguments that might be needed for installer boot
# For instance, on an HP DL360 G6 the serial console is ttyS1 at 115200 baud, so the line would be:
#   set imgargs-host console=ttyS1,115200n

# If no additional arguments are required, then this file is optional, or you can set an empty
# imaargs-host value.

set imgargs-host ARGUMENTS
host-MAC.preseed
# The name of this file is "host-123456abcdef.preseed", where "123456abcdef" is the MAC address of the
# server's Bootstrap Ethernet port (on-motherboard port 1), without spaces or punctuation.

# This file defines the various configuration options to preseed the installer. An example here shows
# the various options, but what to put depends on the exact configuration of pvcbootstrapd. This
# information is, under Redfish, populated automatically based on the information provided in the
# cluster "bootstrap.yml" group vars file.

# Any option not set explicitly here is not set by the bootstrap system by default and should not need
# to be changed by the administrator.

# This BASH-compliant variables file is Loaded during PXE installs to preseed the environment.
# During normal usage, the pvcbootstrapd will load this file, adjust it according to its needs,
# and write out one instance per node to be installed.
#
# This file is thus not designed to be used by humans, and its values are seeded via options in
# the cluster-local Ansible group_vars, though it can be used as a manual template if required.

##
## General definitions/overrides
##
# The Debian release to use (overrides the default)
debrelease="bullseye"

# The Debian mirror to use (overrides the default)
debmirror="http://ftp.debian.org/debian"

# Additional packages (comma-separated) to install in the base system
addpkglist="ca-certificates"

# Alternate filesystem for system volumes (/, /var/lib/ceph, /var/lib/zookeeper)
filesystem="ext4"


##
## Per-host definitions (required)
##

# The hostname of the system (set per-run)
target_hostname="hv1.example.tld"

# The target system disk path; must be a single disk (mdadm/software RAID is not supported)
# This will usually use a `detect` string. A "detect" string is a string in the form "detect:<NAME>:<HUMAN-SIZE>:<ID>".
# Detect strings allow for automatic determination of Linux block device paths from known basic information
# about disks by leveraging "lsscsi"/"nvme" on the target host.
# The "NAME" should be some descriptive identifier that would be part of the device's Model information, for instance
# the manufacturer (e.g. "INTEL") or a similar unique string (e.g. "BOSS" for Dell BOSS cards).
# The "HUMAN-SIZE" should be the labeled human-readable size of the device (e.g. "480GB", "1.92TB").
# The "ID" specifies the Nth 0-indexed device which matches the NAME" and "HUMAN-SIZE" values (e.g. "2" would match the
# third device with the corresponding "NAME" and "HUMAN-SIZE").
# When matching against sizes, there is +/- 3% flexibility to account for base-1000 vs. base-1024 differences and
# rounding errors.
# The "NAME" may contain whitespace but if so the entire detect string should be quoted, and is case-insensitive.
target_disk="detect:LOGICAL:146GB:0"

# SSH key fetch method (usually tftp)
target_keys_method="tftp"

# SSH key fetch path (usually keys.txt)
target_keys_path="keys.txt"

# Deploy username (usually deploy)
target_deploy_user="deploy"

# Consoles to use by the inital boot process; these are normally set automatically
# based on the TTYs found by the installer, and are later overridden by the Ansible
# playbooks based on the hardware configuration. It is best to leave this commented
# unless you know that you need it.
#target_consoles="console=tty1 console=ttyS1,115200"

# Modules to blacklist from the installed system; we include hpwdt (HP Proliant
# watchdog) by default since this is known to cause kernel panics on boot with this
# hardware. Add others here too if you wish to add more to the default.
#target_module_blacklist=( "hpwdt" )

# Installer checkin URI (provided by pvcbootstrapd)
pvcbootstrapd_checkin_uri="http://10.255.255.1:9999/checkin/host"
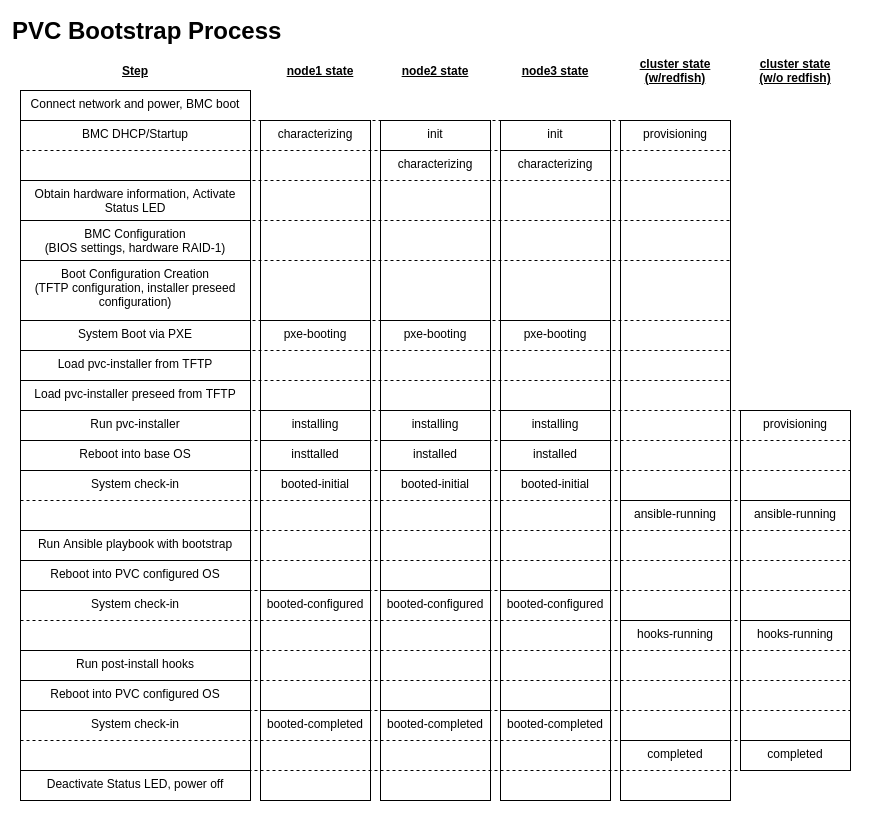
Bootstrap Process
This diagram outlines the various states the nodes and clusters will be in throughout the setup process along with the individual steps for reference. Which node starts characterizing first can be random, but is shown as node1 for clarity. For non-Redflish installs, the first several steps must be completed manually as referenced above.


