20 KiB
| title | description | date | tags | |||
|---|---|---|---|---|---|---|
| Gamifying My Drumming, or: Rock Band 3 with an Alesis Strike Pro | How I connected my electronic drums to a PS3 to play Rock Band 3, with full hi-hat support | 2023-05-09 |
|
The Backstory
I've been a drummer for over 2 decades, since I was 14. As part of my youthful musical exploration journey, I got a very old basic drumkit from my grandfather, who was a big band drummer during his heyday, and I spent some time learning swing beats and trying to emulate some of the drummers I had come to idolize (mostly, Neil Peart). In Grade 10 I auditioned for our high school jazz band on guitar, and while I wasn't successful there, almost on a whim the band director suggested I try the drums too, since he knew from our Grade 9 class that I had excellent rhythm. I pulled out those swing beats my grandfather had taught me, and in contrast to the dudes coming in and playing punk rock rhythms, he picked me handily.
With my new-found purpose in drumming, I got myself (read: my parents got me) a basic Tama drumkit that I used for the next 10 years, slowly adding pieces and cymbals (mostly cymbals), including my favourite addition: a DW double kick pedal I got for my 21st birthday. As much as I loved this kit, as anyone who's ever lived with (or near) a drummer knows, it's a loud hobby. As I moved forward in my career in my mid-to-late 20's, I found I had less and less time to bang out a drum session during reasonable hours, so eventually to save space I put away the kit.
A few years later I had moved on to a new job, working a 13:00-21:00 shift and getting home around 22:45 every night. After having stuck to the bass and keys for a few years at that point, I thought seriously - using my newfound pay raise - about getting an electronic drumset, so I could play at any time and expand my soundscapes with near infinite variety using samples. I eventually settled on the Alesis Strike Pro, which really is a fantastic kit for the cost. I won't go too deep into the features or specs here, but suffice to say that aside from a few quirks, I still love the thing over 5 years later!
The Problem
But, the problem is, not drumming for nearly 5 years took an absolute toll on my skills. Before, I could easily play for an hour or more solid, doing back-to-back-to-back Rush, Dream Theater, Porcupine Tree, and other demanding songs, with nary a care in the world. But after the break, my endurance was absolutely shot - sometimes I could barely finish a song before my arms would "give out", and my general skill had also taken a dive, especially around double-kick and fast fills.
There was also an issue with what I'll call "active feedback" on the Strike. With a real drumkit, I was able to put in earbuds for the music I was listening to, and the sheer sound of the drums would permeate me physically and around the earbuds, and I ended up with a perfect "mix" most of the time without being overly loud in my ears. But with the Strike, being purely electronic audio, it was very hard to find a mix that worked without either blowing out my eardrums or it being very hard to hear myself.
In short, I was stuck in a rut and a catch-22: to improve, I needed the motivation to really play, but I had little motivation to play because I had lost so much of that skill and it was so hard to hear when I played. So, for most of the 5 years I've had the Alesis Strike Pro, it sat idle, barely being played and collecting a nice layer of dust that is very hard to remove from the rubber cymbals.
As further motivation, the COVID-19 pandemic did an absolute number on me personally and health-wise. 2+ years of working from home with very little activity gave me a whole host of health problems, including a significant weight increase, high blood pressure, and anxiety that revolves around (causing and caused by) "left side numbness" as I put it. By early 2022 I was a complete wreck, suffered a serious mental health crisis that still hasn't fully resolved over a year later, and I really needed a way to get myself back into some semblance of shape.
The Solution: Gamify Drumming
Drumming is excellent exercise. Even if you're just playing basic beats, you're doing cardio, strength training on at least 2, maybe 3 or even 4, limbs, and you can work up a sweat fairly easily. So I knew what I needed to do: I needed to actually play my drums. But how?
Well, there was another thing I did a lot of in my early-to-mid 20's: Rock Band! I love this game, even today. Playing Rock Band drums was pretty close to a real drumkit in terms of workout, and was always fun for me, even solo. I still had all my gear kicking around, and a few months ago my good friend suggested we bust out the game for a small gathering of friends, which was a smashing success. But the fake little plastic drumkit has a lot of pain points: the kick pedal has no rebound and is flimsy and easily broken, the positions of the drums are wacky, and hitting them hard (as I'm wont to do) kills them very quickly. This really got me thinking: could I play Rock Band with my Strike? It would solve all the problems, in both directions: I'd get visual feedback for my playing, no audio mixing issues, and I could work up to harder songs and longer sessions over time, while also letting me play the game on a real kit with real positioning and playing feedback (proper kick rebound, drums that didn't feel like a rubber mat, etc.). So I went looking for how to do this.
It turns out I'm definitely nowhere near the first, and I definitely won't be the last. So, the rest of this blog post will detail my setup, how I got it working, the parts I used, and the challenges I've faced with the Strike, with an eye towards helping others do this as well.
Part Zero: The PlayStation 3
I've never been much of a gamer, even going back to my childhood. We had a complete mishmash of consoles over the years (Sega Saturn, then XBox, then PS3), and for the PS3 I think the most we ever owned was 3 games: LittleBigPlanet 1 & 2 and Rock Band 3. But my PS3 still worked perfectly, and as luck would have it, it was an early Slim model that was fully compatible with modding/jail-breaking so I could use RB3 Deluxe and custom songs. I won't detail that part in this blog post, but I was able to jailbreak, reload, and put custom songs onto my PS3 in about an afternoon's worth of work.
Then, as luck would have it, my sister told me that she actually had an old spare PS3 from an ex who had abandoned it with her before they broke up. Even better it was an original fat model, though alas not one with native PS2 support and NAND flash. Further, her fiancé had an older 42" Samsung TV I could use. In my head I jumped right to the idea of having a dedicated PS3 and TV for my drum area so I wouldn't have to move anything around: I could just sit down and play! I got all the pieces, fully cleaned and re-pasted the PS3, set up the TV, repositioned my drums, and got to work with the setup.
Part One: Rock Band 3 Pro
The first step of this is Rock Band Pro mode. Introduced in Rock Band 3, pro mode is designed to give a fully "authentic experience" in playing the instruments. Pro guitar/bass feature a full-fret plastic guitar (versus just 5 buttons), pro keys has you play actual notes over a 2 octave range, and pro drums adds support for 3 cymbals in addition to the "toms"/pads.
As part of Pro mode, Mad Catz made the "Rock Band Pro MIDI adapter", which is pretty much exactly what it sounds like: you can input MIDI from an instrument into it, and it will "convert" it into the signals that Rock Band's Pro mode can handle. It works with virtually anything as long as you send the right MIDI notes, and doing Pro mode with electronic drums is of course one of the supported options.
I got the Wii version of the adapter, because according to much of the community, this was the best option as it was widely available and could be easily modified (by removing a resistor) to support the PS3, while costing up to 1/3 of the price of the PS3 version, the only limitation being a lack of shoulder buttons. So I ordered one from Amazon along with a MIDI cable and hooked it up. I then recalibrated the Alesis head module to output the specific MIDI notes that the adapter was looking for (documented in the manual) for each drum and cymbal.
And it worked!
Part Two: The Hi-Hat
But, there were a couple issues I had. Well, OK, really just one issue that wasn't "me": the Hi-Hat.
See, Rock Band 3 Pro mode for the drums comes with a "Hi-Hat Pedal" mode. They would sell you a second pedal you could use as either a second kick drum or the "hi-hat pedal", and there is an option in the game to turn this mode on. Problem is, this mode doesn't do jack. It does nothing to affect the gameplay or the charts whatsoever.
Now why might that be a problem? Well, as a convention, Rock Band Pro drum charts use the Yellow Cymbal (hereafter YC) for a closed hi-hat note, and sometimes a secondary or tertiary crash. Then they use the Blue Cymbal (BC) for a ride note, a secondary or tertiary crash, and, most importantly, for an open hi-hat note. But only sometimes.
What this means is that a fairly common drum pattern of closed and open notes looks something like this (YC, BC, Ki[ck], Sn[are]):
YC BC YC BC YC BC YC ...
Ki    Sn    Ki    Sn ...
On a real drumkit, this is played with the hi-hat pedal opening and closing the hat on each 8th note. No moving between arm positions, just use of the left foot. It's so basic it's often one of the first "exotic" beats that people learn. Further there's often little open hi-hat splashes that occur inside other beats, which are trivial on a drumkit.
But because of the complete lack of functionality of the "Hi-hat pedal mode", you're forced to play this in Rock Band on two different cymbals. Now, on the tiny plastic Rock Band kit this is annoying but manageable, since your arm only has to move about 10-20 degrees and about 12-18 inches. But on a real kit, this is functionally impossible to do accurately and comfortably at any amount of speed. It's a breaking feature, and I really wanted to solve this.
Now, many low-end drumkits have a workaround for this. You could simply have the drum head unit send a different note, specifically a YC note, for the hi-hat when it's closed, and a BC note for when it's open. Great!
But, the problem is, that's only for low-end kits. See that method of doing things isn't flexible for doing "real things" with DAWs or sequencers or what have you. On higher end kits - and the Alesis Strike Pro is a very high-end kit - what is done instead is to send a single "note" for the hi-hat hit itself, and then also send MIDI CC#4 (Control Channel #4) events containing the position of the pedal. This gives the maximum flexibility for audio equipment to handle the signal. And you can't switch off this mode on the drum kit itself; you're stuck with this mode of operation.
Now here's the craziest thing: Rock Band 3 can accept that CC#4 signal! In fact, it's what the Hi-Hat pedal in the game is mapped to! But because the feature isn't actually implemented, it's useless outside of the "freestyle" mode or fills (which I turn off myself); it doesn't affect the chart or rewrite the notes for you as it "should" (at least, as I think it should have...). A dead end, so I thought.
Part Three: An Arduino and a MIDI Shield
I asked around a few places about this, and I got answers ranging from "why would you want that?" (clearly not a drummer) to "it's impossible". But I knew it wasn't. The solution seemed fairly obvious to me: if I could somehow read the MIDI signal as it was coming out of the drumkit, and, using the CC#4 signal as a guide, rewrite the Hi-Hat note based on the pedal position, I could fake a simple on/off hi-hat signal mode.
Enter the SparkFun MIDI Shield for the Arduino! This shield gives you MIDI-IN and MIDI-OUT ports and interfaces with the internal serial bus of the Arduino. And there is a fully feature-complete library for it as well, allowing one to easily build MIDI functionality in the Arduino IDE.
All the pieces came together for me: I just had to write a bit of conditional code that would read in the MIDI CC#4 events, track the hi-hat "openness" state, handle nodes asynchronously, and rewrite the YC signal to be a BC signal whenever the hi-hat was opened.
As part of this, I leveraged the Pro MIDI adapter's ability to map multiple notes to each game note, so I would send note 22 for the Hi-Hat yellow cymbal, but send note 26 for the Crash yellow cymbal, so they could operate independently. I'd then rewrite only note 22 events based on the pedal, so the crash would always work while the hi-hat would change in response to the pedal.
I also wanted the ability to turn this remapping on and off. Very quickly I noticed some songs where the charting was such that all hi-hat notes, even "open" ones, were mapped to the yellow cymbal, especially during double kick drum passages. Thus for those songs I'd want the ability to turn remapping off so I could still play naturally without needing to adjust my hi-hat physically, then swap back for other songs easily. Luckily the MIDI Shield also comes with push-buttons, so I attached one of them to the board, and added this to the code. I used the red and green LEDs on the board to indicate what mode it's in as well, so I have clear visual feedback of when the remapping is on (green) or off (red).
At this point I had things working enough to do a quick demo video, visible on my YouTube channel here. While my videography failed quite spectacularly after about 3.5 minutes, it gets the point across: this solution was a success!
Part Four: Building the Final Form
One thing I didn't like about the build at this point was the Arduino Uno I was using as the microcontroller. It's hard to explain or really quantify, but the responsiveness of the kit just felt "sluggish" to me, and I attributed this to the performance of the Arduino in reading the MIDI events and then writing them back out. There were also weird issues with floating capacitance causing the mode to flip back and forth constantly at times, which became really annoying.
So I decided to replace the Arduino itself with another microcontroller, the much faster STM32 "Blackpill", of which I had over a dozen lying around from another (failed) project. The Blackpill had a number of benefits: first, it was much faster (up to 16x faster than the Arduino Uno, CPU-wise, with dual ARM cores), it was much smaller and could thus fit into a smaller area, it had 2 serial UARTs so I could actually debug the thing with serial prints, and finally it was able to be powered over USB-C (of which I had many more long cables than I had for USB-A to USB-B).
I soldered everything together with my (brand new) Pine64 Pinecil - which, aside, is the best soldering iron I've ever used - using 22-gauge Ethernet wire I had laying around, and covered it in tape to protect it and the leads as well as eliminate any stray bridging from touching it. I then made a quick little wire mount, soldered onto the potentiometer anchor points of the MIDI Shield, and used this to attach it to the top of my speaker controller for a clean, easily accessible setup.
The debugging part came in real handy as I worked to calibrate excactly what the threshold between open and closed should be, and also helped me greatly simplify the code I had originally written for maximum optimization and thus speed. At this point I started playing regularly on it, and after nearly 2 weeks I've been playing at least once a day, sometimes even more.
Part Five: Pictures and Code!
What would this post be without some pictures?
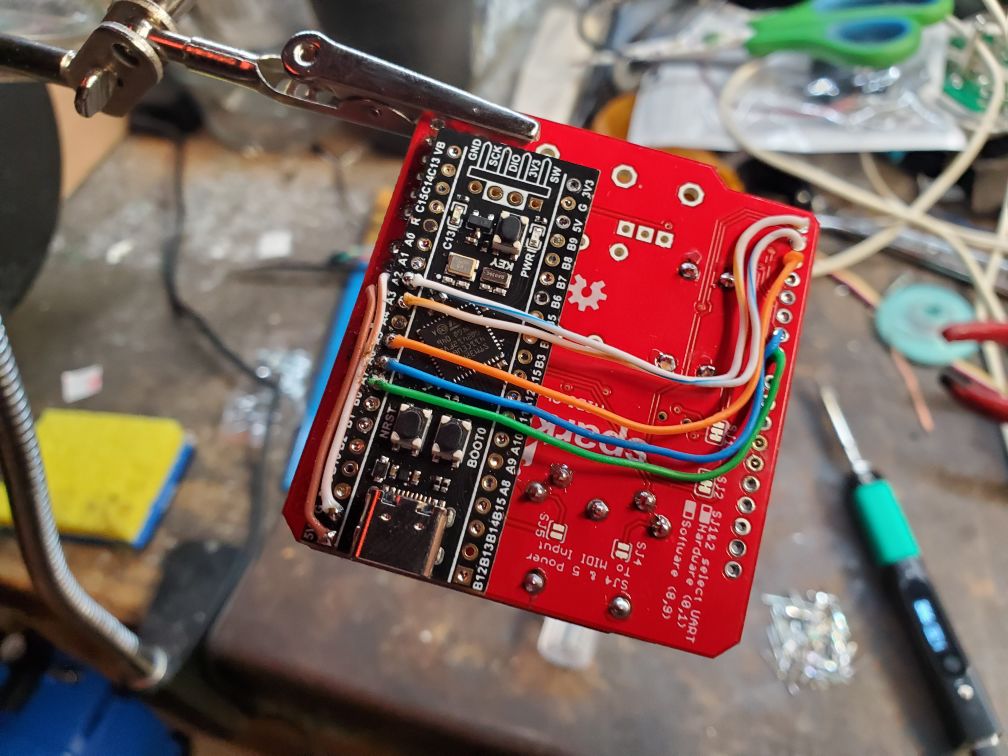
Here is a quick WIP shot of the wiring for the Blackpill and the MIDI Shield. You can see the power along the left and the various signal lines to the shield across the center. A2 and A3 are the second serial UART on the Blackpill; A5 is the button for mode control; and A6 and A7 are the LEDs for status indication. Not shown is the aforementioned heavy wire mount, which was soldered to the mechanical anchor points at the top of the board in this image. The boards are attached together with relatively thick double-sided tape to keep them solidly together while insulating them from each other.
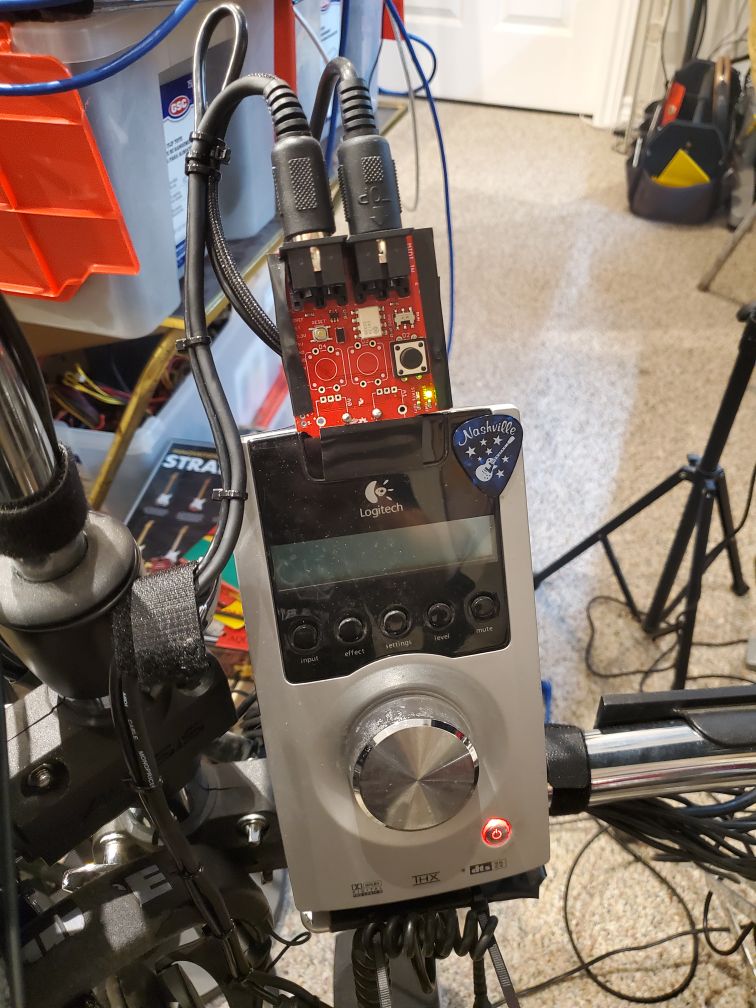
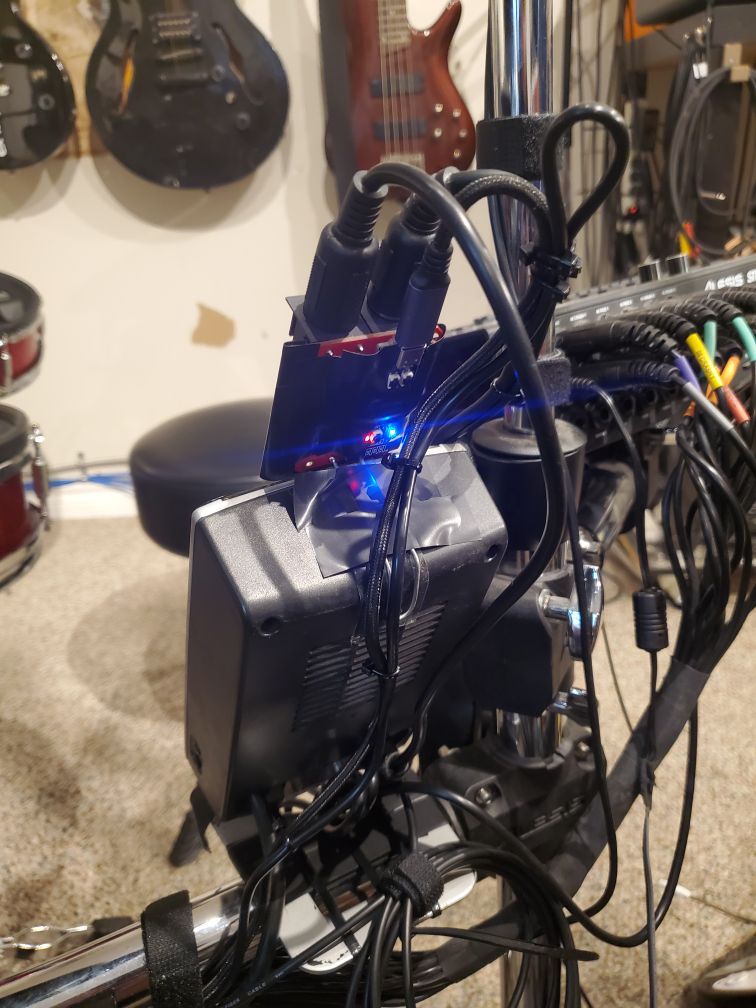
Here are two images, front and back, of the MIDI Rewriter module in its final position with all connections. From the front, the MIDI-IN from the drum head is on the right, while the MIDI-OUT to the Pro Adapter is on the left. USB power is visible on the back, and all the cables are neatly organized using small cable ties. The two USB cables (USB-C power for the Blackpill and USB signal for the Pro Adapter) are routed over to a USB hub by the PS3 along the drum frame.
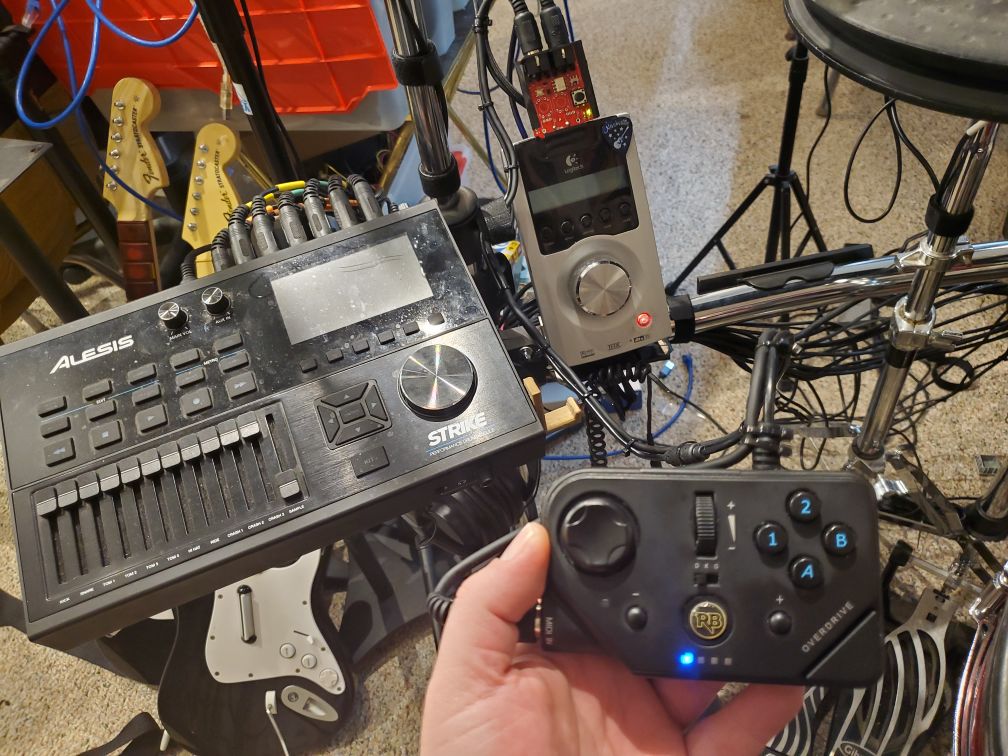
Here is a shot of me holding the Pro Controller. The cables are neatly routed to provide me plenty of slack to hold the controller if needed, and the MIDI cable acts as a loop to hook onto the golden-coloured 3D-printed hook attached to the side of the drum module. Also (slightly) visible underneath the drum module are my headphones that I use during "quiet hours", on another golden 3D-printed hook. This keeps everything together and nicely out of the way while I'm playing while still being accessible instantly.
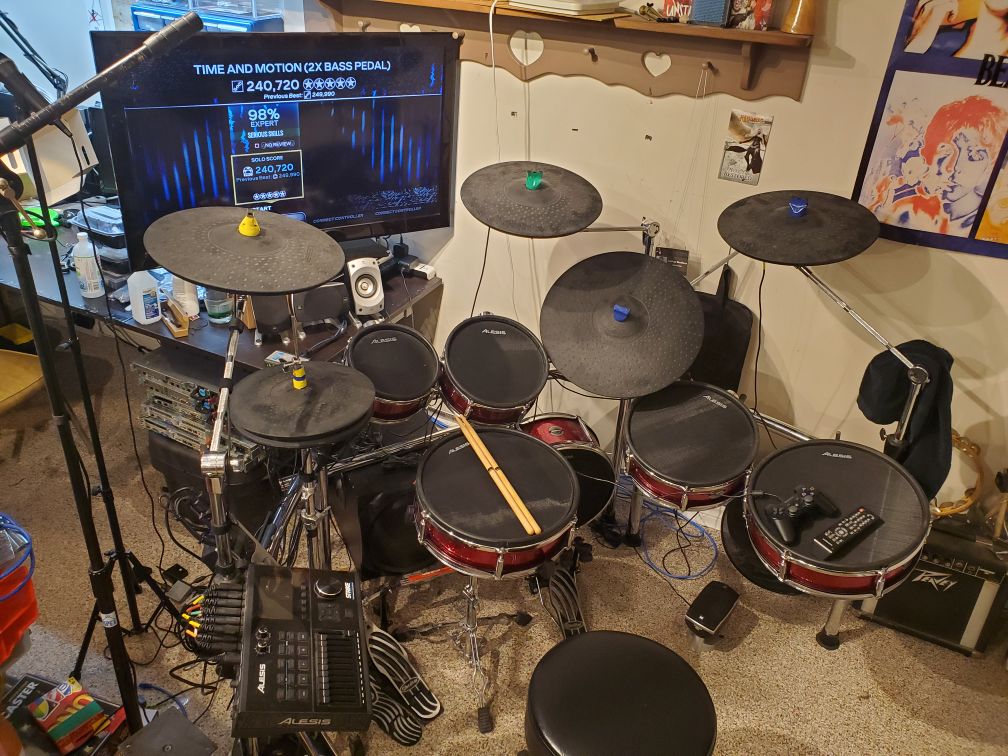
And here's the entire kit setup, with the TV, speakers and PS3 (just behind the uncovered speaker) visible. The USB hub is attached to the desk just behind the Hi-Hat cymbals. The speakers are in Stereo 2x mode, with both the pair on the desk as well as a pair on the floor on either side of me (right one visible). I used coloured electrical tape to add little colour accents for the cymbals to help establish my muscle memory for the game, which took a solid week to get used to (versus the original Rock Band drums), but now I just like how it looks. The fact that the Strike Pro has 3 crashes worked out wonderfully here as I'm able to have both the normal Green Cymbal crash, along with separate "crash" versions of the Yellow and Blue cymbals for when I feel that playing authentically requires them. For toms, the rack toms are mapped as you would expect (smallest is yellow, next is blue), and the "floor" toms both are technically mapped to green but I only use the first, with the second acting as a convenient table for the remote and vocal controller. Bonus: my best result yet for Time and Motion by Rush (a custom chart by ejthedj on C3)!
Finally, the code for the Blackpill version of the Rewriter module is available on my GitHub for anyone interested in implementing their own.
Part Six: Demo Video!
Here's a demo of me playing a song with the finalized version of everything. The hi-hat action still isn't perfect but it's more than good enough to "feel good" to play.
{{< youtube cA7e7zTVD7E >}}
Part Seven: Conclusions and Next Steps
All in all I'd consider this project a resounding success. First and most importantly, it's got me wanting to drum, often 2 or 3 times a day in short 15-30 minute increments. It took a little while to get used to this layout and I'm slowly building back my endurance, but the goal of making me want to drum by gamifying it has definitely worked well. Second it was a very fun project, letting me use all my biggest skillsets to achieve a goal I wanted for a long time, which was deeply satisfying.
For next steps, I have a few ideas. First of course I plan to continue tweaking the hi-hat settings mercilessly until I get them just right, but I fear I'm limited as much by the Strike Pro (it's always been flaky on open/closed hi-hat work) and my own skill as I am by the controller, but I'll try. I also plan to implement a foot pedal switch to swap modes, along with better debouncing code, so that I could theoretically switch the Rewriter module on and off mid-song if I wanted to, though so far I haven't found much of a need for this.
I hope you find this post interesting, useful, and perhaps inspiring! Please send me an email if you have any feedback!
